
Building Monster Chops
Part Three
In the first two segments you learned how to execute "Free Strokes" using the Gladstone technique, which is used by the world's fastest drummers. For this third and final part of this series, I'll show you how to perform "Controlled Strokes" and how to apply the technique to your everyday playing.
Controlled Stroke Exercises
Controlled strokes make use of the 3 playing levels that you learned in Building Monster Chops: Part 2
(see the sidebar). They're also the secret to achieving incredible dynamics without muscle tension.
Full Stroke to Half Stroke (Down)
The first exercise we'll work on is the Full Stroke (approximately 18 inches from the drumhead) to Half stroke
level (approximately 5 inches above the drum head). See photo 1 for your beginning (Full Stroke) position and
Photo 2 for your ending (Half Stroke) position. Think of this exercise as a Down Stroke.
The only difference between this Down Stroke and the Free Stroke type Down Stroke from last week, is instead of beginning at the Full Stroke position (photo 1) and ending in the Full Stroke position (photo 1), you begin at the Full Stroke position (photo 1) and end in the Half Stroke position (photo 2). This is accomplished by stopping your wrist at the Half Stroke level. Remember, don't grab the stick to stop it from moving because that creates tension. Simply stop your wrist at the Half Stroke level and the stick will (eventually) stop as well.
If you're using the Gladstone technique correctly, the stick will flop around a little before stopping at the Half Stroke level. Also, remember to hold the stick only as tightly as you must to avoid dropping it. What makes the Gladstone system so devastatingly fast is the lack of muscle tension in your fingers, wrists, and arms.
Repeat the previous exercise with each hand separately. Start at the Full Stroke level and stop at the Half Stroke level as explained. Then, move your stick back up to the Full Stroke level starting position and repeat the exercise. Repeat this process until you get comfortable with the technique of stopping your wrist at the Half Stroke level. Once you are comfortable with each hand, continue with the next exercise.
Half Stroke to Full Stroke (Up)
Think of this exercise as the Up Stroke. Although in the previous two parts of this series I said that the
Gladstone system uses no Up Strokes, technically, these aren't really Up Strokes. You are still using a Down
Stroke to make the motion but because we will now be starting at the Half Stroke level and stopping at the
Full Stroke level, we call this as an Up Stroke (to avoid confusion later when we actually apply the
technique).
Start with the stick at the Half Stroke level (photo 2) and throw it down to the drumhead with enough force to allow it to rebound, bringing your wrist back up to the Full Stroke position (photo 1). Move your stick back down to the Half Stroke level (photo 2) and repeat the exercise, just like you did with the Full to Half Down Stroke exercise before.
Putting It All Together
Once you feel you are executing the Down Stroke (Full to Half) and Up Stroke (Half to Full) exercises
correctly, it's time to put them together. Start with your right hand at the Full Stroke level (photo 1) and
throw the stick down toward the drumhead. As the stick rebounds, stop your wrist at the Half Stroke level
(photo 2). Then, throw the stick back down toward the drumhead with enough force to carry your wrist back up
with it to the Full Stroke position (photo 1).
You have just executed a Down and a corresponding Up stroke in the Gladstone system.
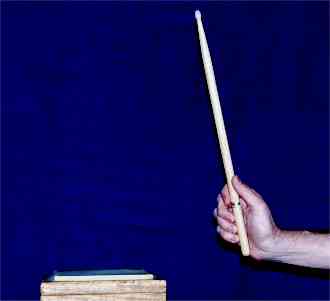
Photo #1

Photo #2
The Rest of the Story
Follow the steps you learned to perform the Full to Half Down Stroke and work on the Half Stroke to Low
Stroke. The only difference is that you will be starting your stick from the Half Stroke level (5 inches above
the drumhead, as in photo 3) and stopping your wrist at the Low Stroke level (2 inches above the drumhead, as
in photo 4). Once you have perfected this exercise, practice the Up Stroke part of it, as follows.
Start at the Low Stroke level (photo 4) and throw the stick down toward the drum with enough velocity to bring your wrist up to the Half Stroke level (photo 3). Stop your wrist and the stick will wiggle itself to a stop. If the stick doesn't move but stops immediately, you're applying pressure to stop the stick. This is NOT what you want to do. It creates unnecessary tension that will slow you down later, when you're working for speed.
Once you perfect the Down and Up Stroke separately, put them together and play the Down Stroke followed by the Up Stroke. First practice the right stick alone and then practice with your left stick, like you did with the previous Half to Full / Full to Half Combination.
The final Controlled Stroke you need to practice is the Full (photo 5) to Low (photo 4) Down Stroke and Low (photo 4) to Full (photo 5) Up Stroke. Work these the same way as in the prior exercises. The only difference will be in the Low Stroke to Full Stroke exercise. You'll find that you'll need to apply a slight (very slight) upward pull on the stick to help bring it all the way back up to the Full Stroke position (photo 5).
As Fast As You Can
When you practice the previous Controlled Stroke exercises, always throw the stick down as fast as you can.
This will give the stick the rebound force necessary to bring your wrist back up with it. Don't worry if a
stick flies out of your hand once in a while. If this happens, you're using the Gladstone technique correctly!
If the sticks never fly out of your hands in practice, either you're a natural with the Gladstone technique,
or (more likely) you're holding your sticks too tight.
Photo #3
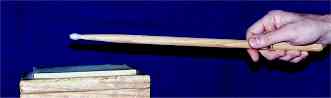
Photo #4
Photo #5
Now, I'll give you some examples of how to apply the Gladstone technique to your playing.
Applying The Gladstone Technique
Now for the application of the Gladstone technique to your actual playing. See figure 1 for an example of how
to play Triplets. Here is an explanation of the Key:
- D = DOWN and means that you play a Full to Half Stroke (Down Stroke).
- U = UP and means that you play a Half to Full Stroke (Up Stroke).
- T = TAP and means that you play a Free Stroke type Half Stroke (meaning a Half Stroke Down Stroke back to a Half Stroke Up Stroke).
Take a look at figure 2, which shows how you would apply the Gladstone technique to the Single Paradiddle. Again, use the DUT Key from the previous Triplet study.
I recommend that you practice the Triplet and Paradiddle stickings slowly until you understand the reason for each D, U, and T designation. If you examine them carefully, you'll see that the Gladstone technique prepares you for accenting a note by having you raise the stick to the proper level (Full Stroke Level) at least one note ahead of time. This is the key to playing effortlessly and is the technique that allows great drummers like Buddy Rich, Louis Bellson, and Joe Morello to play so effortlessly - Making their accents appear to fly in from out of nowhere.
You're On Your Own
With this third and final segment on Building Monster Chops, you have a complete mini-crash course in the
Billy Gladstone technique. Apply the DUT system explained above to everything you play.
Take a book like George Stone's Stick Control and apply the Gladstone technique. Begin by playing each exercise slowly and then work them for speed.
In the beginning, you'll probably have to write down the DUT's under each sticking combination
but after a while, you'll be able to figure them out automatically as you play.
Although it's a shame that the Billy Gladstone technique is not more widely known, taught, or accepted, I (along with some of the world's greatest drum technicians) have found it to be the best technique available. And it can easily be applied to every style of drumming. Give it a shot and you too can have Monster Chops.
Until next time: Stay loose.
Click the following link for Building Monster Chops: Part 1!
Click the following link for Building Monster Chops: Part 2!