
Building Monster Chops
Part Two
In the first part I revealed the secret to building monster chops: The Gladstone technique. We also discussed some of the basic underlying principles needed to understand the system. This week, we'll apply those principles as we learn to play drums using the incredible Gladstone technique. The technique used by the world's fastest drummers.
Six Basic Principles
There are six basic principles that make up the Gladstone System. They are:
- Find the optimum balance point of your drumsticks.
- Grip your drumsticks only tight enough to prevent them from flying out of your hands.
- Use only down strokes, never an up-down stroke. The natural rebound force from the stick itself is enough to pull your hand back up to the starting position. The trick (and the most difficult part of the technique to learn) is to teach your hand to be loose enough to allow the stick to pull it back up.
- Dynamics are controlled in two ways: Levels and speed. There are 3 basic playing levels in the Gladstone system. For example, if you want to play louder, increase the distance between the stick and the drum's surface. To control volume using speed, apply the principle that says "every action has an equal and opposite reaction." In other words, the faster you throw the stick down on your down stroke, the louder it will strike and the faster it will rebound. Never squeeze the stick tighter in an effort to play louder. This will only increase muscle tension and slow you down.
- For optimum performance, you must develop maximum flexibility in your fingers, hands, wrists, and arms, along with lightening quick racehorse-type muscles.
- The faster you play, the more relaxed you should become. When using the Gladstone technique properly, you'll NEVER feel any tension in your fingers, hands, wrists, or arms. This is the main principle behind the tremendous speed and endurance afforded by the Gladstone technique.
To review these principles in greater detail, see Building Monster Chops: Part 1 (in the sidebar). The remainder of this article shows you how to apply these principles to your actual playing.
Three Ways to Play
There are three basic techniques used for drumming:
- Arms: Sacrifices extreme speed for power and maximum volume.
- Wrists: Sacrifices maximum volume for speed.
- Fingers: Sacrifices volume for maximum speed.
Although we will be specifically discussing wrists and fingers, what you learn can be applied to arm technique as well.
Full Stroke
The Full Stroke not only makes an excellent warm-up, it's also a great exercise to develop your playing
muscles. Use Full Strokes whenever you need volume and power, but not maximum speed. Here's how to use them:
- Hold your sticks in your natural playing position (either traditional or matched grip), and begin the Full Stroke with your wrist bent as far back as it will go. The stick should point nearly straight up. This may be uncomfortable at first, especially if your muscles are tight. The more you practice the Full Stroke, the easier it will be to get the stick all the way up into the position of photo 1 (right stick) and photo 2 (left stick). Note: If you use matched grip, then your left stick Full Stroke starting position should match photo 1.
- Throw the stick down toward the drum as quickly as possible and let it bounce back up. If you keep your wrist loose enough, and grip the stick just tight enough to prevent it falling out of your hand, the momentum of the stick will be enough to pull your wrist back up with it.
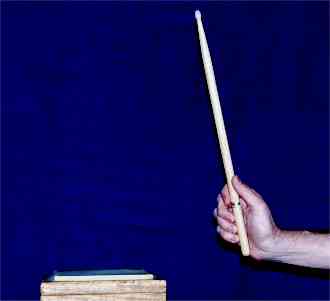
Photo #1
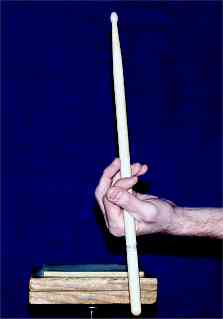
Photo #2
How To Practice the Full Stroke
Make slow, deliberate taps with the right stick only. To make sure you are playing the Full Stroke correctly,
say "down" as you play each stroke. The stick should return before you have the chance to say
"up." If you find that you can say "down" and "up" as you play your Full Stroke,
you are not doing it right.
Review this article from the top and try again. Once you can play the right hand Full Stroke correctly, try the left hand Full Stroke. Here are some things to watch out for:
- Start your Full Stroke with the stick as close to straight up as your wrist will allow. (Your wrists will become more limber with time and practice).
- Throw the stick down as fast as you can but without tensing your grip. Hold the stick only tight enough to prevent dropping it.
- Don't stop the stick as it bounces off the drum. Let the natural momentum pull your wrist all the way back to the starting position.
- If a stick does flies out of your hand once in a while, you're playing correctly! In the beginning, this is normal. It will stop once you get comfortable with this relaxed way of playing.
- Because sticks will be flying out of your hands in the beginning, you shouldn't use this technique on the job until you are comfortable with it.
Once you perfect the Full Stroke, start working on the Half and Low Stroke techniques that follow.
Half Stroke
This is played in exactly the same way as the Full Stroke except that your starting position is five inches
from the drum (see photo 3 for right stick and photo 4 for the left stick using the traditional grip). You
throw the stick down from the five-inch level, and you stop your wrist as the stick returns to the five-inch
level.

Photo #3
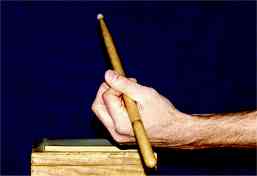
Photo #4
Low Stroke
This uses the same technique as the Half and Full Strokes, the difference is that the Low Stroke starts and
ends two inches above the drum (see photos 5 and 6). Note: Whether you're playing low, half, or full strokes,
if you're playing properly, the stick should never come to a sudden stop. If your stick is stopping dead,
you're probably squeezing it. The idea is to stop your wrist at the proper level and let the natural momentum
of the stick continue up and then settle back down to rest where you stopped your wrist.
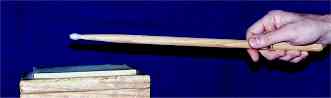
Photo #5

Photo #6
All it Takes is Proper Practice
Practice your Full Strokes very slowly, first with the right hand and then with the left. Then play alternate
single strokes. Next, play double strokes and paradiddles. Remember, the main purpose of the Full Stroke is to
increase your wrist strength and flexibility and it makes a great warm up exercise to prepare you to play full
speed without injuring your muscles. After you have warmed up using the Full Stroke, repeat the same exercises
for speed using the Half Stroke level. Finally, increase the tempo again and practice playing Low Strokes.
If you are new to drumming, the Gladstone technique will be easy for you to learn. If you're an experienced player who has learned the "up-down" method, it will take you a bit longer to break your old habits. But I strongly suggest that you give the Gladstone system a try. Once you learn it, I doubt if you'll ever want to go back to any other.
What you've just learned is known as Free Strokes. Check out my third and final article on the Gladstone technique (see the link below), where you'll learn how to use Controlled Strokes.
Until next time: Stay loose.
Click the following link for Building Monster Chops: Part 3!