
Four-Way Rock Chops: Lesson 1
Since I wrote the feature articles on Four-Way Jazz Chops (see the Related Links sidebar), I've received requests for similar lessons in the rock vein. Here is the first installment, which covers the basic techniques I use to develop four-way rock chops. (Note: This article assumes knowledge of basic reading skills. If you are weak in this area, you can use my Tiger Reading series in the Related Links sidebar to brush up before you begin.)
Rock Is Easier
Rock notation, in general, is easier to read than jazz because there is no interpretation involved. What you
see is what you play. For example, take a look at the eighth-notes in Example #1A.
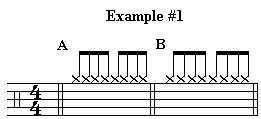
When you see the pattern in Example #1A in a rock drum chart, you play it exactly as written (see Example #1B). What you have to beware of, especially if you are a jazz player, is that straight rock must be played "straight" to sound authentic. Rock, like jazz, has a certain "feel" to it that you can pick up by listening to recordings. Don't only listen to your favorite rock groups; listen to many of them - old and new. You'll pick up lots of tips and tricks along the way.
Ride Cymbal Patterns
Like jazz, rock has standard right hand ride cymbal patterns that you must memorize and learn to coordinate
against a variety of left hand snare drum patterns. (If you play a left-handed drum kit, then reverse my right
and left hand notations.) Note that you must practice all of these ride cymbal patterns both on a ride cymbal
and a hi-hat.
Example #2 through #6 shows the five basic rock ride patterns. Let's examine them one at a time.
Straight Quarters

Example #2 is the deceptively simple looking straight quarter-note ride pattern. I find that many beginning students fail to play this pattern "in the pocket." That is, they never really nail down the time and feel. Don't fall into the trap of neglecting to practice this pattern. Although it looks simple, you must practice it to the point where you can play any other left hand snare pattern against it without losing the groove.
Eventually, you'll be playing patterns with your other three limbs against this ride pattern. But for now, concentrate on playing this pattern using three parts of the stick - the tip, butt, and shank. The tip of the stick is used for a lighter feel while the shank or butt is used for a heavier feel. You should also be able to alternate between the tip and shank for example, by playing with the tip on the 1st and 3rd beats and the shank on the 2nd and 4th beats of the measure. This gives you the sound of accenting the 2nd and 4th beats.
Offbeat Eighths
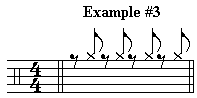
Example #3 is another pattern that looks simple on the outside, yet many drummers fail to get the correct groove going. The key is to practice it to the point where you can play any pattern against it with your left hand and, eventually, any of your other three limbs.
Like the straight quarter-note ride pattern we looked at earlier, apply the tip, butt, and shank of the stick to the offbeat ride. Use the tip of the stick for a lighter feel, the shank or butt for a heavier feel.
Straight Eighths
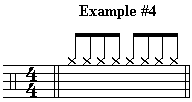
Example #4 shows a pattern that is probably the most common of all rock rides. Again, you can vary the groove simply by combining various accents and using different parts of the stick. For a light groove, use the tip of the stick. For a heavy groove, use the shank or butt of the stick. Next, play the downbeats of 1, 2, 3, and 4 with the shank and the upbeat "an" counts with the tip. This gives you accented downbeats and unaccented upbeats. Also try reversing this, which will give you unaccented downbeats and accented upbeats. Play around with it. There are many variations you'll come up with.
Straight Sixteenths
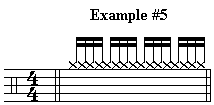
Example #5 shows a basic sixteenth-note pattern. This is the basis for funk, disco, and many other rock styles. Again, practice playing it with the tip of the stick first and then experiment using the shank and butt. Also, practice all rides on the hi-hat as well as on the ride cymbal.
Rock Shuffle

Example #6 shows another basic rock beat. Although it's called a shuffle, don't confuse it with the feel of the jazz shuffle. This is entirely different.
The jazz shuffle feel is interpreted as eighth-note triplets (see Four-Way Jazz Chops in the Related Links sidebar), even though it is often written exactly like the rock shuffle shown in Example #6. The rock shuffle is played exactly as written. This gives it a much straighter, tighter feel. Once you can play this pattern with the correct groove, then experiment using various accents and play it using different parts of your stick.
Let's Add The Left
Once you've developed a solid right hand ride pattern, the next step is to play some patterns against it with
your left hand on the snare.
Once you've developed solid right hand ride patterns (using the basic five patterns shown in Examples 2 though 6), the next step is to coordinate them with some left hand snare patterns.
Take a look at example #7 below. (Note: If you normally play your ride cymbal with the left hand, then reverse the right and left parts.)
Each of the exercises in Example #7 are basic left hand snare patterns that you should be able to play against the straight quarter-note ride pattern shown. Practice the exercises separately until you can play each one with ease. Then play all exercises straight through (playing each one once) from start to finish. Once you've perfected that, play them starting from the last one and working backward to the first.
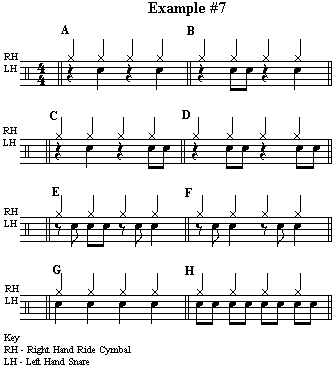
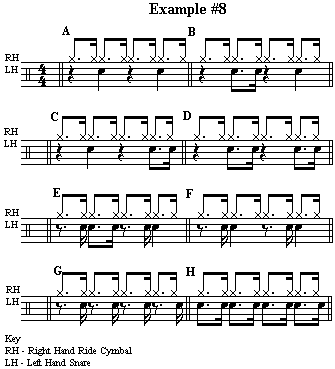
Once you can play all of the above exercises easily, practice them again replacing the right hand quarter-note ride with any of the three basic rock ride patterns shown in Example #3 through #5. If you're wondering why I left Example #6 out, it's because you wouldn't normally play straight eighth-note left hand patterns against a shuffle ride. See Example #8 for more appropriate left hand patterns to play against a rock shuffle ride.
Once you've conquered the two-way coordination necessary to play the exercises in this lesson, the next step is to add three- and finally four-way coordination.
For Further Study
Perfect your two-way coordination. Make up your own left hand patterns and practice them against the five
basic rock ride patterns I've given you.
In the next installment Four-Way Rock Chops: Lesson 2 (see link below), we'll add the feet to the mix for full four-way coordination.
Until next time: Stay loose.
Click the following link for Four-Way Rock Chops: Lesson 2!